
Showing posts with label Easy Amigurumi patterns. Show all posts
Showing posts with label Easy Amigurumi patterns. Show all posts
Thursday, February 2, 2012
Little Babies Dolls
Saturday, January 21, 2012
New Amigurumi Patterns: Mini Gang and 4 Seasons Birds
This week I have two new Amigurumi crochet patterns. Mini Gang:


The other new pattern is "Four Seasons Birds":

Sunday, October 30, 2011


Sunday, September 4, 2011
Amigurumi Free Basic Body Crochet Pattern

This is a pattern for the body of an Amigurumi doll. Skirt, jackets, hats and accessories are missing. Included are head, body, arms and legs. This is part of the Pink Little Lady pattern. I post this separate for all those who like to make a different doll using the basic pattern. The above doll was made by Lauren. She made an army of Anime Characters using this basic pattern.You can check them out on DeviantArt. They are great.
Pattern
This pattern can be made using any yarn you wish. Choose a hook size that matches the yarn.
Materials:
- 3.00 mm hook
- 4 ply yarn
- Polyester fiberfill
Size:
The doll is about 4.5 inches/ 11.5 cm highAbbreviations:
ch = chain
sc = single crochet
st = stitch
sl = slip
rnd = round
tog = together
dc = double crochet
Note:
This project is working in continuous rounds, do not join or turn unless otherwise stated. Mark first stitch of each round.
Leg (make 2):
Rnd 1: With feet color, ch 2, 6 sc in second chain from hook. (6)
Rnd 2: (Sc in next st, 2 sc in next st) around. (9)
Rnd 3: Sc in each st around, changing to pants/leg color in last 2 loops of last st.
Rnd 4-8: Sc in each st around.
For first leg, join with sl st in first st. Fasten off.
For second leg, do not sl st in first st. Do not fasten off.
Head and Body:
Rnd 1: Hold legs together with upper inner thighs together. Insert hook in the center on innermost thigh of first leg, pull out the loop from second leg, sc in same st (do not count this st just for connecting legs together), sc in next 8 sts on second leg (mark first st), sc in next 8 sts on first leg. (16) 
Rnd 2: (2 sc in next st, sc in next 7 sts) 2 times. (18)
Rnd 3: (Sc in next 2 sts, 2 sc in next st) around, changing to body/shirt color in last 2 loops of last st. Stuff. (24)
Rnd 4: Sc in each st around.
Rnd 5: Working in back loops only. Sc in each st around.
Rnd 6: Sc in each st around.
Rnd 7: (Sc in next 6 sts, sc next 2 sts tog) around. (21)
Rnd 8: Sc in each st around.
Rnd 9: (Sc next 2 sts tog, sc in next 5 sts) around. Stuff. (18)
Rnd 10: (Sc next 2 sts tog, sc in next st) around, changing to head color in last 2 loops of last st. (12)
Rnd 11: (2 sc in next st, sc in next st) around. (18)
Rnd 12: (Sc in next 2 sts, 2 sc in next st) around. (24)
Rnd 13: (Sc in next 3 sts, 2 sc in next st) around. (30)
Rnd 14: (Sc in next 4 sts, 2 sc in next st) around. (36)
Rnd 15-18: Sc in each st around.
Rnd 19: (Sc in next 4 sts, sc next 2 sts tog) around. (30)
Rnd 20: (Sc in next 3 sts, sc next 2 sts tog) around. (24)
Rnd 21: (Sc in next 2 sts, sc next 2 sts tog) around. Stuff. (18)
Rnd 22: (Sc in next st, sc next 2 sts tog) around. (12)
Rnd 23: Sc next 2 sts tog around, sl st in first st. Fasten off. Sew opening close. (6)Arm (make 2):
Rnd 1: With skin/arm color, ch 2, 6 sc in second chain from hook. (6)
Rnd 2: (Sc in next st, 2 sc in next st) around. (9)
Rnd 3: (Sc in next st, sc next 2 sts tog) around. (6)
Rnd 4: Sc in each st around.
Rnd 5: Sc in each st around, changing to body/ shirt color in last 2 loops of last st.
Rnd 6-7: Sc in each st around, sl st in first st. Fasten off.
Stuff hands a little bit, sew arms to body.
On Ravelry you can see over 22 different dolls made with the Pink Little Lady pattern.

Copyright 2011 Sayjai of K and J Dolls. All rights reserved. This pattern is provided for free but is copyrighted. Please do not post this pattern on other blogs, forums or websites.
Thursday, July 28, 2011

Sunday, July 24, 2011
Free Ball Flowers Crochet Pattern

Thursday, July 21, 2011
Funky or Cool Guys Amigurumi Pattern

This is a new pattern for the summer: Cool Guys. Perhaps the patterns will be ready this weekend.
Thursday, July 14, 2011
Halloween Girls: Easy Crochet Pattern for a Little Witch, Devil and Pumpkin Girl
I was asked to create a small and cute Jazzy the Witch. Here it is together with a little devil and pumpkin girl. The pattern can be bought on Etsy.

Friday, April 29, 2011
Heart cushion crochet pattern
The heart cushion below is 16 x 11 inches. You work in the round. The patterns is available in my Etsy shop: kandjdolls.etsy.com.

Monday, April 4, 2011
Sunshine Girl II


I made a new Sunshine Girl and spent a lot of time on doing the hair. This time I used cotton yarn to make doll & hair. I sewed one yarn at a time for hair, and sewed them on both sides to make 2 pig tails. I think the eyes are a bit too big (used 7.5 mm because I did not have the 7mm.) and should change color of head at rnd 24 (rnds 24 - 28 should be the same color as hair)

Friday, April 1, 2011
Pinky the Bunny


Sunday, March 13, 2011
Free Amigurumi crochet pattern: Vegimal Tunip
Vegimal Tunip
Amigurumi Pattern

K and J Dolls
Pattern designed by Sayjai of K and J Dolls
Tunip the Vegimal is a character from the Octonauts. A hugely popular cartoon on BBC CBeebies.
Copyright on this pattern: 2011 Sayjai of K and J Dolls. All rights reserved. Vegimal and the Octonauts are copyrighted by Meomi. This Vegimal pattern cannot be reproduced. It cannot be published on other websites or blogs. If you like to you can use the photo above on your blog and link to this pattern on http://kandjdolls.blogspot.com.
The Vegimal can be made using any yarn you wish. Choose a hook size that matches the yarn.
Materials:
I have used:
1) 3.25 mm hook (US= D, UK = 10)
2) 4 ply yarn (yellow, green, blue and white)
3) Polyester fiberfill
4) Two 4 mm black beads for eyes or other eyes as desired
5) Tapestry needle
6) Sewing needle and thread for attaching eyes
Size: Vegimal Tunip is 11.5 cm high
Abbreviations:
ch = chain sc = single crochet
st = stitch sl = slip
rnd = round tog = together
dc = double crochet hdc = half double crochet
Note: This project is working in continuous rounds, do not join or turn unless otherwise stated.
Mark first stitch of each round.
Head and Body:
Rnd 1: With blue, ch 2, 4 sc in second chain from hook. (4)
Rnd 2: (Sc in next st, 2 sc in next st) around. (6)
Rnd 3: (Sc in next st, 2 sc in next st) around. (9)
Rnd 4: (Sc in next st, 2 sc in next st) 4 times, sc in next st. (13)
Rnd 5: Sc in each st around.
Rnd 6: (2 sc in next st, sc in next 2 sts) 4 times, 2 sc in next st. (18)
Rnd 7: (2 sc in next st, sc in next 2 sts) ) around, changing to yellow in last 2 loops of last st. (24)
Rnd 8-9: Sc in each st around.
Rnd 10: (Sc in next 5 sts, 2 sc in next st) around. (28)
Rnd 11-13: Sc in each st around.
Rnd 14: (Sc in next 2 sts, sc next 2 sts tog) around. (21)
Rnd 15: (Sc next 2 sts tog, sc in next st) around. Stuff. (14)
Rnd 16: Sc next 2 sts tog around, sl st in first st. Fasten off. (7)
Tail (make 2):
Rnd 1: With blue, ch 2, 4 sc in second chain from hook. (4)
Rnd 2: (Sc in next st, 2 sc in next st) around. (6)
Rnd 3: 2 sc in next st around. (12)
Rnd 4: Sc in each st around.
Rnd 5: Sc next 2 sts tog around. (6)
Rnd 6: Sc next 2 sts tog around, sl st in first st. Leave long end for sewing, fasten off. (3)

Sew Rnd 6 of tails together, sew to Rnd 1 of the body.
Fin (make 2):

Use pins to position fins, sew to body.
Leaf 1 (make 1):
Rnd 1: With green, ch 2, 6 sc in second chain from hook. (6)
Rnd 2: (Sc in next st, 2 sc in next st) around. (9)
Rnd 3: Sc in each st around.
Rnd 4: Sc next 2 sts tog 4 times, sc in next st. (5)
Rnd 5-7: Sc in each st around.
Rnd 8: Sc in each st around, sl st in first st. Leave long end for sewing, fasten off.
Leaf 2 (make 4):
Rnd 1: With green, ch 2, 4 sc in second chain from hook. (4)
Rnd 2: (Sc in next st, 2 sc in next st) around. (6)
Rnd 3: Sc in each st around.
Row 4: Working in rows, flatten last rnd, matching sts and working through both
thicknesses, sc in next 2 sts, turn.
Row 5-6: Ch 1, sc in next 2 sts, turn. (2)
Row 7: Ch 1, sc in next 2 sts, fasten off.

Muzzle: With white, ch 3, 3 sc in second ch from hook, sl st in same ch, 3 sc in next ch,
sl st in same ch, leave long end for sewing, fasten off.
Finishing:
Sew muzzle on Rnds 8-10 of head.
Sew leaves on the middle top of head.
Sew eyes 6 sts apart between rnds 11-12 of head.
Copyright 2011 Sayjai of K and J Dolls. All rights reserved. This is a free pattern. You are not allowed to sell this pattern. You are not allowed to distribute or publish this pattern in any form. You are not allowed to alter this pattern in any way. This pattern is provided to you freely for personal use only.
This original pattern is available on the blog of K and J Dolls: http://kandjdolls.blogspot.com
Wednesday, February 16, 2011
Easter Bears Amigurumi pattern

For Easter I made this lovely bear pattern. They fit into the little egg basket.

The crochet pattern is available in my Etsy Shop.

Monday, January 31, 2011
Free heart crochet pattern for Valentine

Valentine is near! Below is an Instruction Video and an easy crochet pattern to make a little Heart.
Materials used: 3.00 mm hook and 4 ply or dk yarn

Size: wide 1.8 inches/ 4.5 cm, high 1.5 inches/ 4 cm
Abbreviations: ch = chain, sc = single crochet, st = stitch, sl = slip, rnd = round, tog = together

Hump (make 2):
Rnd 1: With red, ch 2, 6 sc in second chain from hook. (6)
Rnd 2: 2 sc in each st around. (12)
Rnd 3: Sc in each st around.
For first hump, join with sl st in first st. Fasten off.
For second hump, do not sl st in first st. Do not fasten off.
Rnd 4: With the right side facing you, sc in st on first hump (mark first st), sc in next 11 sts on first hump, sc in next 12 sts on second hump. (24)

Rnd 5: Sc in each st around. (24)
Rnd 6: (Sc in next 4 sts, sc next 2 sts tog) around. (20)
Rnd 7: (Sc in next 3 sts, sc next 2 sts tog) around. (16)
Rnd 8: (Sc in next 2 sts, sc next 2 sts tog) around. Stuff. (12)
Rnd 9: (Sc in next st, sc next 2 sts tog) around. (8)
Rnd 10: (Sc next 2 sts tog) around, join with sl st in first st. Fasten off.. (4)
Sew all openings close.

Copyright 2011 Sayjai. All rights reserved.
This is a free pattern for your personal use only. You are not allowed to sell this pattern. You are not allowed to distribute or publish this pattern in any form (this includes other blogs and websites). If you like visitors of your website to read this pattern: provide a link to this blog post but do not copy the pattern onto your site. Please respect the work of original designers. Thank you.

Wednesday, January 26, 2011

Saturday, November 27, 2010


Sunday, November 7, 2010
Little Mermaid, free Amigurumi crochet pattern
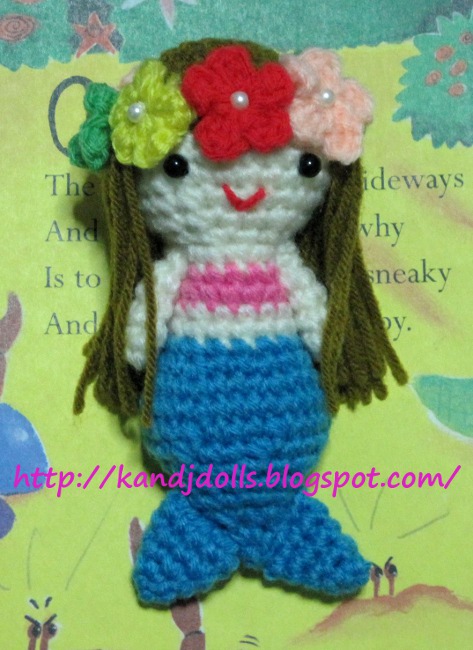
K and J Dolls
Pattern designed by Sayjai
This English pattern is also available in German.
© 2010 Sayjai / K and J Dolls, All rights reserved. This pattern cannot be published on another website or blog. Please respect my copyright.

Little Mermaid
This pattern can be made using any yarn you wish. Choose a hook size that matches the yarn.
I have used:
- 3.00 mm hook
- 4 ply yarn (cream, blue, pink, brown, red, green, peach and yellow)
- Polyester fiberfill
- Two 4 mm black beads for eyes or other eyes as desired
- Eight 3 mm white beads for decorate the flowers
- Tapestry needle
- Sewing needle and thread for attaching eyes and white beads to flowers
Size: Little Mermaid is 4.5 inches/ 11.5 cm high
Abbreviations:
ch = chain
sc = single crochet
st = stitch
sl = slip
rnd = round
tog = together
dc = double crochet
Note: This project is working in continuous rounds, do not join or turn unless otherwise stated. Mark first stitch of each round.
Head and Body:
Rnd 1: With brown, ch 2, 6 sc in second chain from hook. (6)
Rnd 2: 2 sc in each st around. (12)
Rnd 3: (Sc in next st, 2 sc in next st) around. (18)
Rnd 4: (Sc in next 2 sts, 2 sc in next st) around. (24)
Rnd 5: (Sc in next 7 sts, 2 sc in next st) around. (27)
Rnd 6: Sc in each st around, changing to cream in last 2 loops of last st.
Rnd 7: Working in back loops only. Sc in each st around.
Rnd 8: (Sc in next 8 sts, 2 sc in next st) around. (30)
Rnd 9: (Sc in next 8 sts, sc next 2 sts tog) around. (27)
Rnd 10: (Sc in next 7 sts, sc next 2 sts tog) around. (24)
Rnd 11: (Sc in next 2 sts, sc next 2 sts tog) around. (18)
Rnd 12: (Sc in next st, sc next 2 sts tog) around. (12)
Rnd 13: (Sc in next st, 2 sc in next st) around, changing to pink in last 2 loops of last st. (18)
Rnd 14: Sc in each st around.

Rnd 15: Sc in each st around, changing to cream in last 2 loops of last st.
Rnd 16: Sc in next 4 sts, sc next 2 sts tog, sc in next 7 sts, sc next 2 sts tog, sc in next 3 sts. (16)
Rnd 17: Sc in each st around, changing to blue in last 2 loops of last st.
Rnd 18: Sc in next 4 sts, 2 sc next st, sc in next 7 sts, 2 sc in next st, sc in next 3 sts. (18)
Rnd 19: (Sc in next 2 sts, 2 sc in next st) around. (24)
Rnd 20: (Sc in next 3 sts, 2 sc in next st) around. (30)
Rnd 21: Sc in each st around.
Rnd 22: (Sc in next 3 sts, sc next 2 sts tog) around. (24)
Rnd 23: (Sc in next 2 sts, sc next 2 sts tog) around. (18)
Rnd 24: (Sc in next st, sc next 2 sts tog) around. (12)
Rnd 25-26: Sc in each st around.
Rnd 27: Sc next 2 sts tog around. (6)
Rnd 28: Sc next 2 sts tog around, sl st in first st, fasten off. (3)

Tail (make 2):
Rnd 1: With blue, ch 2, 4 sc in second chain from hook. (4)
Rnd 2: (Sc in next st, 2 sc in next st) around. (6)
Rnd 3: (Sc in next 2 sts, 2 sc in next st) around. (8)
Rnd 4: (Sc in next 3 sts, 2 sc in next st) around. (10)
Rnd 5: Sc in each st around, sl st in first st. Leave long end for sewing, fasten off.
Sew the opening close flat.

Sew tails on rnd 26-28 of body.
Arm (make 2):
Rnd 1: With cream, ch 2, 6 sc in second chain from hook. (6)
Rnd 2-5: Sc in each st around.
Rnd 6: Sc in each st around, sl st in first st. Fasten off.
Sew arms to body.
Hair:
Cut 34 pieces of brown 5“ long yarn (15 cm). Hold two strands of yarn, fold in half. With top of the head facing, insert hook toward outer of head in free loops on rnd 6, draw the folded end through the stitch and pull the loose ends through the folded end, draw the knot up tightly. Add fringe from one side of head to the back of head and from here to the other side of head. Do not add fringe in the front (10 sts).

Flower (make 8)
With red, ch 3, dc in first chain, ch 2, sl st in first ch, (ch 2, dc in first ch, ch 2, sl st in first ch) 4 times. Leave long end for sewing, fasten off.
Sew the flowers around the head.
With red, ch 3, dc in first chain, ch 2, sl st in first ch, (ch 2, dc in first ch, ch 2, sl st in first ch) 4 times. Leave long end for sewing, fasten off.
Sew the flowers around the head.
Finishing:
Sew eyes 6 sts apart between rnds 8-9 of head. With red embroider mouth.

On FlickR is a group where you can show pictures of your finished doll: http://www.flickr.com/groups/kandjdolls/
Copyright 2010 Sayjai of K and J Dolls. All rights reserved. May not be reproduced or published in any form. You cannot publish this pattern on your blog or website. You are not allowed to sell this pattern. You are not allowed to alter this pattern in any way. This pattern is provided to you freely for personal use only. Please support independent designers and respect my copyright.
Subscribe to:
Posts (Atom)