Showing posts with label Tutorial. Show all posts

Wednesday, February 1, 2012

NO MORE RIPPED PANTIES - cutting hardware posts tutorial

How many of us love our pretty glass knobs? Put up your hand!

How many of us hate the metal post that sticking out the back? Put up your hand!

We like to put pretty knobs on pretty furniture,
and we like to put our pretty things into the
drawers and cupboards of our pretty furniture.
Sometimes our pretty things get caught on these
not so pretty protruding posts and cause damage to our pretty things.

This post is dedicated to saving all your pretty things!


One of the last things I do after installing glass knobs on furniture
is to cut the posts off and I thought you may like to learn how I do it.


There are 3 tools I use for this job.


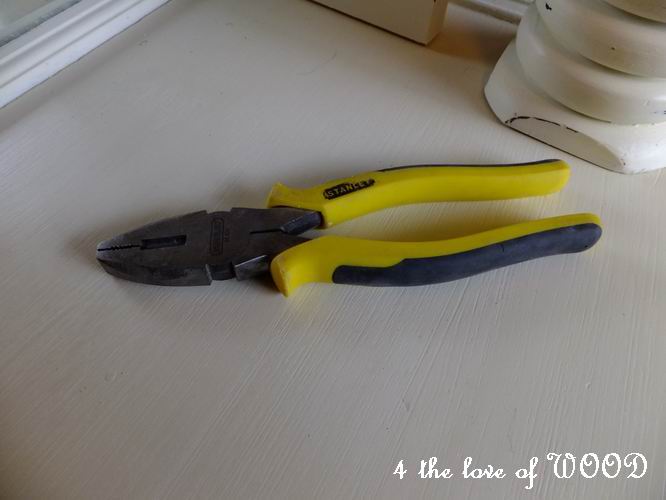
A pair of pliers


to tighten the nut on the post.


A set of mini bolt cutters


to easily cut off the post.


A metal rasp or file


to smooth the edges of the metal.


You have now protected all your pretty things.
You should be able to find a version of these 3 tools at your local home improvement store.

AND

tomorrow I'll have this project to share with you ...


Sharing at:

Miss Mustard Seed's Creative Blog My Repurposed Life

Thursday, December 15, 2011

SHEET MUSIC WREATH - tutorial


Over the weekend I had a good friend come to console me in my hour of need.
(After the dentist ripped a molar from my jaw!)
We spend some of our time building her a sheet music wreath
for her Christmas decor.


SUPPLIES NEEDED:
glue gun and glue
scissors
hole punch
box cutter knife
string
sheet music (minimum 32 pages)
square of heavy box cardboard (min. 6 x 6)


We made an extra large one using full pages on the outer ring
and half pages for the inner ring.
Start by wrapping your first page into a cone and secure with hot glue.


It may take a few tries but you will get the hang of making the cones
fairly quick. For the outer ring Lisa got in the groove quicker then I did,
so we let her hands finish all the outer ring.


While I ran beads of hot glue down the sides of each finished cone to attach the next.


Normally I use 21 cones for the outer ring,
 regardless of the size.
Lisa just kept making them so we ended with 24 cones.


21 cones so far
Rather than attached them to a backer to start,
I like attaching them to each other so I can stretch them
into a circle and they flatten out a bit.
PHOTO EXAMPLE BELOW


The second layer of cones we used 23 half sheets.
I got into the groove of making these ones while Lisa was cutting the sheets for me.


Each were glued over the bottom layer seams.
Once the second layer is in place gently turn your wreath over.
You will quickly see or feel how flexible the wreath is right now.


Here is where we attached the cardboard to stiffen up the wreath and create your hanger.
Cut your cardboard into a square and hot glue into place.


Punch a hole for your hanging string in a corner of the cardboard backer.
This step is easy to do with a paper hole punch just before you attached it to the wreath.


Measure and cut your hanging string extra long (you can always shorten it later)
Thread it threw your cardboard and secure it with some glue.


We picked one of the extra pin wheels left over from the Christmas sale
to glue in the center.


Here she is proudly displayed over Lisa's mantle.

Monday, December 12, 2011

SHEET MUSIC TREES - tutorial


Here is the Sheet Music Tree tutorial so many have asked for.


Supplies you will need:
Sheet music book with cover
Scissors
Glue gun and Glue
Glitter
White glue
Styrofoam cone


First cover the bottom of the cone with the sheet music


Cutting a circle an inch bigger then the cone base
and cutting notches every inch or so around for folding up the sides


With your hot glue adhere the tabs up the sides of the cone.
Below you can see the finished look of the bottom.

Using the heavier weight book cover
roll it into a cone shape to make your tree the height you want.
Quickly scan through the next few photos to help you understand what you are trying to achieve.

Once you have achieved the size you want glue it together.
Keep in mind your cone is going to fit inside the base
so the base circumference needs to be considered.


Working with your Styrofoam cone
Trim any excess off the bottom of the cardboard cone.


With your hot glue run a bead around the Styrofoam cone about
an inch from the bottom, then slide your cardboard cone over top and into adhere into place.
Below you can just see where the glue ring is peeking out where the cardboard seam.

I chose this method so I didn't have to spend more money on bigger Styrofoam cones,
and to get varying heights with multiple trees.


Start cutting your sheet music into strips approx. 1.5" wide.


Next cut into your strips every half inch,
3/4 of the way up from the bottom.


Take each cut and fraid strip and roll it in your hands to curl the edges.
Gently roll back and forth.

With your hot glue gun and starting at the bottom of you tree form,
run a bead of glue half an inch from the bottom around the base.


Trim smaller pieces to fit the missing gaps and glue them into place.


To help things go faster as you grow your tree up,
overlap several strips together and cut your fraid edges.


Continue wrapping and gluing your strips half an inch apart
all the way to the tree top.


Keeping each ban level will create a gap around the top edge
which helps push or hold the next fraid edge curl out more.

Once you get all the way to the top of your tree
you can start to apply some glitter.
These trees look great with or without glitter so of course this
next step is optional.


Add a dab of white glue to the branch tips.

Then sprinkle with glitter.

Now proudly display your trees.