Showing posts with label Valentine and Easter patterns. Show all posts

Saturday, January 21, 2012

New Amigurumi Patterns: Mini Gang and 4 Seasons Birds

This week I have two new Amigurumi crochet patterns. Mini Gang:


The other new pattern is "Four Seasons Birds":


This is a pattern for all four seasons: The Green Bird is for the spring. She comes with a pattern for little easter eggs. The Blue Bird is for the Summer and has a pattern for colorful flowers. The Orange Bird stands for Autumn and has a delicious candy corn pattern. The White Bird is for the winter. She comes with a cute Santa Hat and Christmas Tree.

Friday, April 1, 2011

Pinky the Bunny

Andrea (akinna-stisue.blogspot.com) made these bunnies for her daughter's friends. Pinky the Bunny is one of my patterns. She has two outfits and a cute bag. The bunnies are exactly like in the pattern, except that she gave them a different mouth like Miffy.

Tuesday, March 29, 2011

Daffodil Spring Fairy Crochet Pattern

We moved this winter to the UK. It's great to see the spring coming. I see many daffodils everywhere. Most are planted and some are wild. I like this new pattern a lot. It's different from my previous patterns and was a great project.

The crochet pattern for the Fairy and Daffodils is sold on kandjdolls.etsy.com

Wednesday, February 16, 2011

Monday, January 31, 2011

Free heart crochet pattern for Valentine


Valentine is near! Below is an Instruction Video and an easy crochet pattern to make a little Heart.


Materials used: 3.00 mm hook and 4 ply or dk  yarn

Size: wide 1.8 inches/ 4.5 cm, high 1.5 inches/ 4 cm

Abbreviations: ch = chain, sc = single crochet, st = stitch, sl = slip, rnd = round, tog = together


Hump (make 2):
Rnd 1: With red, ch 2, 6 sc in second chain from hook. (6)
Rnd 2: 2 sc in each st around. (12)
Rnd 3: Sc in each st around.

For first hump, join with sl st in first st. Fasten off.
For second hump, do not sl st in first st. Do not fasten off.

Rnd 4: With the right side facing you, sc in st on first hump (mark first st), sc in next 11 sts on first hump, sc in  next 12 sts on second hump. (24)

Rnd 5: Sc in each st around. (24)
Rnd 6: (Sc in next 4 sts, sc next 2 sts tog) around. (20)
Rnd 7: (Sc in next 3 sts, sc next 2 sts tog) around. (16)
Rnd 8: (Sc in next 2 sts, sc next 2 sts tog) around. Stuff. (12)
Rnd 9: (Sc in next st, sc next 2 sts tog) around. (8)
Rnd 10: (Sc next 2 sts tog) around, join with sl st in first st. Fasten off.. (4)

Sew all openings close.
 
Copyright 2011 Sayjai. All rights reserved.

This is a free pattern for your personal use only. You are not allowed to sell this pattern. You are not allowed to distribute or publish this pattern in any form (this includes other blogs and websites). If you like visitors of your website to read this pattern: provide a link to this blog post but do not copy the pattern onto your site. Please respect the work of original designers. Thank you.

Wednesday, February 24, 2010

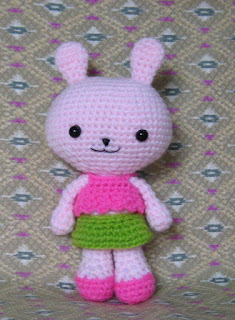
Pink Little Lady Doll

Crochet pattern for Amigurumi doll
Publisher: K and J Dolls
K and J Dolls Website: kandjdolls.blogspot.com
Author: Sayjai
First published: February 2010
Copyright 2010 Sayjai, K and J Dolls, All rights reserved

This pattern can be made using any yarn you wish. Choose a hook size that matches the yarn. For easy printing you can download the pattern as a PDF file: Pink Little Lady.pdf


Translations:
  1. Italiano: Piccola Signora in Rosa - Schema Amigurumi (PDF)
  2. Deutsch: Kleine Pink Lady - Amigurumi Häkelanleitung 
  3. Español: Señorita Rosa - Esquema de amigurumi (PDF)
  4. Français: Petite Dame Rose - Patron d’Amigurumi Gratuit
If you have an e-book reader: Look on Smahswords.com. You can download the pattern on Smashwords for many e-book readers. (Including the Amazon Kindle) You can also buy the Kindle pattern for around 1.25$ on Amazon.com: Pink Little Lady - Amigurumi Bunny Girl Crochet Pattern on Amazon. (I will try to make the pattern available for free on Amazon, but currently this is not possible for me.). For iPad users you can download the pattern on iTunes.


Materials:
  • 3.00 mm hook
  • 4 ply yarn (cream, pink, dark pink and red)
  • Mohair yarn (light pink for hair)
  • Black embroidery floss
  • Polyester fiberfill
  • Two 4 mm black beads for eyes or other eyes as desired
  • Tapestry needle
  • Sewing needle and
  • thread for attaching eyes
Size:
Pink Little Lady is 4.5 inches/ 11.5 cm high (excluding rabbit ears)
Abbreviations:
ch = chain
sc = single crochet
st = stitch
sl = slip
rnd = round
tog = together
dc = double crochet
Note:
This project is working in continuous rounds, do not join or turn unless otherwise stated. Mark first stitch of each round.
Leg (make 2):
Rnd 1: With dark pink, ch 2, 6 sc in second chain from hook. (6)
Rnd 2: (Sc in next st, 2 sc in next st) around. (9)
Rnd 3: Sc in each st around, changing to cream in last 2 loops of last st.
Rnd 4-8: Sc in each st around.

For first leg, join with sl st in first st. Fasten off.
For second leg, do not sl st in first st. Do not fasten off.
Head and Body:
Rnd 1: Hold legs together with upper inner thighs together. Insert hook in the center on innermost thigh of first leg, pull out the loop from second leg, sc in same st (do not count this st just for connecting legs together), sc in next 8 sts on second leg (mark first st), sc in next 8 sts on first leg. (16)
Rnd 2: (2 sc in next st, sc in next 7 sts) 2 times. (18)
Rnd 3: (Sc in next 2 sts, 2 sc in next st) around, changing to pink in last 2 loops of last st. Stuff. (24)
Rnd 4: Sc in each st around.
Rnd 5: Working in back loops only. Sc in each st around.
Rnd 6: Sc in each st around.
Rnd 7: (Sc in next 6 sts, sc next 2 sts tog) around. (21)
Rnd 8: Sc in each st around.
Rnd 9: (Sc next 2 sts tog, sc in next 5 sts) around. Stuff. (18)
Rnd 10: (Sc next 2 sts tog, sc in next st) around, changing to cream in last 2 loops of last st. (12)
Rnd 11: (2 sc in next st, sc in next st) around. (18)
Rnd 12: (Sc in next 2 sts, 2 sc in next st) around. (24)
Rnd 13: (Sc in next 3 sts, 2 sc in next st) around. (30)
Rnd 14: (Sc in next 4 sts, 2 sc in next st) around. (36)
Rnd 15-18: Sc in each st around.
Rnd 19: (Sc in next 4 sts, sc next 2 sts tog) around. (30)
Rnd 20: (Sc in next 3 sts, sc next 2 sts tog) around. (24)
Rnd 21: (Sc in next 2 sts, sc next 2 sts tog) around. Stuff. (18)
Rnd 22: (Sc in next st, sc next 2 sts tog) around. (12)
Rnd 23: Sc next 2 sts tog around, sl st in first st. Fasten off. Sew opening close. (6)
Skirt:
Rnd 1: Working in front loops of round 4 of the body and head pointed towards you. With pink, join with sl st , ch 1, sc in same st, sc in next 2 sts, 2 sc in next st, (sc in next 3 sts, 2 sc in next st) 5 times. (30)
Rnd 2: Sc in each st around.
Rnd 3: (Sc in next 4 sts, 2 sc in next st) around. (36)
Rnd 4: (Ch 3, sc in next st) around, fasten off.
Arm (make 2):
Rnd 1: With cream, ch 2, 6 sc in second chain from hook. (6)
Rnd 2: (Sc in next st, 2 sc in next st) around. (9)
Rnd 3: (Sc in next st, sc next 2 sts tog) around. (6)
Rnd 4: Sc in each st around.
Rnd 5: Sc in each st around, changing to pink in last 2 loops of last st.
Rnd 6-7: Sc in each st around, sl st in first st. Fasten off.

Stuff hands a little bit, sew arms to body.
Hair:
With light pink(mohair). Wind the yarn loosely and evenly around a 5” (12.5 cm) piece of card board until the card is filled, then cut across one edge, repeat as needed. For hair, hold two strands of yarn, fold in half. With top of the head facing, insert hook toward outer of head in middle top of head, draw the folded end through the stitch and pull the loose ends through the folded end, draw the knot up tightly. Add hair around until the hairs cover the head.
Hair Band:
Strap:
With pink, leave 6 inch (15 cm) of yarn at beginning, ch 10, leave 6 inch (15 cm), fasten off. (10)
Rabbit ear (make 2):
Rnd 1: With pink, ch 2, 6 sc in second chain from hook. (6)
Rnd 2: (Sc in next st, 2 sc in next st) around. (9)
Rnd 3-4: Sc in each st around.
Rnd 5: (Sc in next st, sc next 2 sts tog) around. (6)
Rnd 6-7: Sc in each st around, sl st in first st. Fasten off.

Sew ears on middle of strap. Put hair band on.

Finishing:
Sew eyes 8 sts apart between rnds 16-17 of head. With black embroidery floss, embroider eyelashes. With red, embroider mouth on rnd 15.
Basket:
Rnd 1: With dark , ch 2, 6 sc in second chain from hook. (6) pink
Rnd 2: 2 sc in each st around. (12)
Rnd 3: (Sc in next st, 2 sc in next st) around. (18)
Rnd 4: Working Sc in each st around. in back loop only.
Rnd 5-6: Sc in each st around.
Rnd 7: Sc in each st around, for handle; sl st in next st, ch 10, skip 8 sts, sc in next st, sc in each ch across, sl st in first st, fasten off.
On FlickR is a group where you can show pictures of your finished doll: http://www.flickr.com/groups/kandjdolls/

The original pattern is available on the blog of K and J Dolls: http://kandjdolls.blogspot.com/

Copyright 2010 Sayjai, K and J Dolls. All rights reserved. You are not allowed to sell this pattern. You are not allowed to distribute or publish this pattern in any form. You are not allowed to publish this pattern on other websites. You are not allowed to alter this pattern in any way (you can alter your doll ofcourse). This pattern is provided to you for personal use only.


Ravelry page:

Saturday, February 13, 2010

Tiny Kitty: Free pattern

Pattern designed by Jaimai and translated by Sayjai (K and J Dolls).


Many thanks to Jaimai for being so kind to allow me to translate Tiny Kitty. Jaimai's Thai blog: jaimai.bloggang.com

Materials: 
  • 3.00 mm hook
  • 4 ply yarn (white, pink, blue, black and yellow)
  • Polyester fiberfill
  • Tapestry needle
  • Black embroidery floss
Update: Unfortunately this pattern is no longer available in English or German. Legal representatives of Sanrio claimed it looks like Hello Kitty. 

This pattern is perhaps still  available in:
- Portuguese (Português) (This translation is on the blog of Erika)
- Dutch (Nederlands) (This translation on the blog of Charlotte)


Samantha (SykoSam on Ravelry) made this beautiful Kitty:


She made the dress longer: she added 3 rows to it. The flower was a magic circle of 6 sc, then ch2, 3dc, 2ch, sl st into each st.

Erika (erikatricoche.blogspot.com) made this Hello Kitty:


~ Sayjai ~

Sunday, January 24, 2010

Dolls with cute duck, bunny, frog, bear and piggy cap

Finally a new pattern is finished. It's very Japanese and cute. The pattern is sold in my shop: kandjdolls.etsy.com . It is available in English (using U.S. crochet terms) and German. Soon I will release a new free amigurumi pattern.
Japanese little Amigurumi dolls: duck, frog, pig, bunny and bear
Fluffy Babies: Small Amigurumi Japanese dolls with cap

Sunday, January 10, 2010

Valentine Crochet Pattern

I have finished a new Boy and Girl doll set. They are called
"Valentine Love".

The pattern is in my Etsy Store and you can bid on it on e-bay: click here to see my patterns on e-Bay

Friday, October 16, 2009

Pinky the Rabbit

Pinky was grumpy yesterday. But she is happy now. :)

Pinky the Rabbit Yesterday:

Amigurumi Rabbit

Today:

Amigurumi Rabbit
Pinky the Rabbit - Amigurumi

Wednesday, September 9, 2009

Free pattern: "Pink Rabbit Monster" Finished

free amigurumi crochet patternfree amigurumi crochet pattern


A German translation is available on my German Blog and a Swedish translation is available on Cissi's Swedish Amigurumi Blog.

Pattern for the Pink Rabbit Monster Witch

For halloween I added a hat and broomstick.

This pattern can be made using any yarn you wish. Choose a hook size that matches the yarn

Materials:
I have used :
3.00 mm hook
4 ply yarn (Light pink, dark pink for inner ear, Red and green for hat)
Polyester fiber
Black 10 mm buttons for eyes or other eyes as desired
Tapestry needle
Sewing needle and thread for attaching eyes
Iron Wire 7 inches


Size: 6 inches tall

Abbreviations:
ch = chain
sc = single crochet
st = stitch
sl = slip
rnd = round
tog = together
hdc = half double crochet
dc = double crochet

Note: This project is working in continuous rounds, do not join or turn
unless otherwise stated. Mark first stitch of each round.

Head and Body:

Starting at the bottom of the body.

Rnd 1: With light pink, ch 2, 6 sc in second chain from hook. (6 sc made)
Rnd 2: 2 sc in each st around. (12)
Rnd 3: (Sc in next st, 2 sc in next st) around. (18)
Rnd 4: (2 sc in next st, sc in next 2 sts) around. (24)
Rnd 5: Sc in next 2 sts, 2 sc in next st, (sc in next 3 sts,
2 sc in next st) 5 times, sc in next st. (30)
Rnd 6: (Sc in next 4 sts,2 sc in next st) around.(36)
Rnd 7: (2 sc in next st, sc in next 5 sts) around. (42)
Rnd 8: Sc in next 3 sts, 2 sc in next st, (sc in next 6 sts,
2 sc in next st) 5 times, sc in next 3 sts. (48)
Rnd 9: Sc in each st around.
Rnd 10: (Sc in next 7 sts, 2 sc in next st) around. (54)
Rnd 11: Sc in each st around.
Rnd 12: Sc in next 4 sts, 2 sc in next st, (sc in next 8 sts,
2 sc in next st) 5 times, sc in next 4 sts. (60)
Rnd 13-20: Sc in each st around.
Rnd 21: (Sc in next 8 sts, sc next 2sts tog) around. (54)
Rnd 22: Sc in each st around.
Rnd 23: (Sc in next 7 sts, sc next 2 sts tog) around. (48)
Rnd 24: Sc in each st around.
Rnd 25: (Sc in next 6 sts, sc next 2 sts tog) around. (42)
Rnd 26: Sc in each st around.
Rnd 27: (Sc in next 5 sts, sc next 2 sts tog) around. (36)
Rnd 28: Sc in each st around. Stuff.
Rnd 29: (Sc in next 4 sts, sc next 2 sts tog) around. (30)
Rnd 30: (Sc in next 3 sts, sc next 2 sts tog) around. (24)
Rnd 31-36: Sc in each st around.
Rnd 37: (Sc in next 2 sts, sc next 2 sts tog) around. Stuff. (18)
Rnd 38: (Sc in next st, sc next 2 sts tog) around. (12)
Rnd 39: (Sc next 2 sts tog) around, join with sl st in first st.
Fasten off.

Foot (make 2):

Rnd 1: With light pink, ch 2, 6 sc in second chain from hook. (6 sc made)
Rnd 2: 2 sc in each st around. (12)
Rnd 3: (Sc in next st, 2 sc in next st) around. (18)
Rnd 4-12: Sc in each st around. Stuff.
Rnd 13: For first toe, sc in next 3 sts, skip next 12 sts,
sc in next 3 sts. (6)
Rnd 14: Sc in each st around.
Rnd 15: (Sc next 2 sts tog) around, join with sl st in first st.
Fasten off.
Rnd 13: For second toe, join light pink to next free st on rnd 12, ch 1,
sc in same st, sc in each of next 2 sts, skip next 6 sts,
sc in last 3 sts. (6)
Rnd 14-15: Repeat rnds 14-15 of first toe.
Rnd 13: For third toe, join light pink to next free st on rnd 12, ch 1,
sc in same st, sc in next 5 sts. (6)
Rnd 14-15: Repeat rnds 14-15 of first toe.

Sew foots to bottom of body.

Ear (make 2 light pink, 2 dark pink):

Row 1: Ch 10, sc in second chain from hook, hdc in next 2 chs,
dc in next 3 chs, hdc in next 2 chs, sc in next ch. Fasten off. (9)

Matching sts, hold 1 light pink ear and 1 dark pink ear tog, with dark pink side facing you. Join light pink with sl st at end of row 1, ch 1, sc in same st, sc in next 7 sts, (2 sc in next st) 2 times, sc in next 8 sts. Fasten off.

Sew ears to side of head on rnd 37.

Arm (make 2):

Rnd 1: With light pink, ch 2, 6 sc in second chain from hook. (6)
Rnd 2-8: Sc in each st around.
Rnd 9: 2 sc in each st around. (12)
Rnd 10-12: Sc in each st around. Stuff.
Rnd 13: Sc next 2 sts tog around. Fasten off. Sew opening closed. (6)

Sew arms to side of body over rnd 23-24.

Hat:

Rnd 1: With red, ch 2, 6 sc in second chain from hook. (6)
Rnd 2: Sc in each st around.
Rnd 3: (2 sc in next st, sc in next st) around. (9)
Rnd 4: (Sc in next 2 sts, 2 sc in next st) around. (12)
Rnd 5: (Sc in next 3 sts, 2 sc in next st) around. (15)
Rnd 6: Working in front loops only. Ch 1, reverse sc in each st around,
join with sl st in first st. Fasten off.

***Reverse sc is working from left to right, insert hook in next st to the right and complete as sc.***

Pom-pom: Wrap green around cardboard 20 times, slide loops off cardboard; tie separate strand around middle of all loops. Cut loops, trim; sew to end of hat.

Sew hat on top of head.

Witch hat (pink):

Rnd 1: With pink, ch 2, 6 sc in second chain from hook. (6)
Rnd 2: Sc in each st around.
Rnd 3: (Sc in next st, 2 sc in next st) around. (9)
Rnd 4: Sc in each st around.
Rnd 5: (2 sc in next st, sc in next 2 sts) around. (12)
Rnd 6-7: Sc in each st around.
Rnd 8: (2 sc in next st, sc in next 3 sts) around.(15)
Rnd 9: Sc in each st around.
Rnd 10:(Sc in next 4 sts, 2 sc in next st) around. (18)
Rnd 11: Sc in each st around.
Rnd 12: (Sc in next 5 sts, 2 sc in next st) around.(21)
Rnd 13-14: Sc in each st around.
Rnd 15: (Sc in next 6 sts, 2 sc in next st) around. (24)
Rnd 16: (For ear hole,Ch 3, skip 3 sts; sc in next 9 sts) 2 times.
Rnd 17: (Sc in next 3 sts, 2 sc in next st) around.(30)
Rnd 18: (Sc in next 4 sts, 2 sc in next st) around. (36)
Rnd 19: (Sc in next 5 sts, 2 sc in next st) around, join with sl st in first st. Fasten off.(42)

Sew hat on top of head.

Broom: With pink.

Part 1: Broomstick

Rnd 1: Ch 2, 6 sc in second chain from hook.(6)
Rnd 2: Working in back loops only. Sc in each st around.
Rnd 3-13: Sc in each st around, join with sl st in first st. Fasten off

Part 2 : Bristles

Cut 20 pieces of yarn, 6 inches in length. Fold the yarn in half and loop an iron wire around the center, and then twist the wire up together.

Assembly: Put the iron wire inside part 1, sew them together, tie a piece of yarn around the bristles, to make it look like a real straw broom. Trim the broom.

Finishing:

Sew eyes 3 sts apart over rnds 35-36 of head. With red, embroider mouth.


Copyright 2009 Sayjai Thawornsupacharoen. This is a free pattern. You are not allowed to sell this pattern. You are allowed to distribute this pattern and sell finished dolls based on this pattern, provided you add the following link and text:

The original pattern is available on the blog of K and J Dolls:
http://kandjdolls.blogspot.com/2009/09/free-pattern-pink-rabbit-monster.html

This work is licensed under the Creative Commons Attribution-Noncommercial-Share Alike 3.0 Unported License. To view a copy of this license, visit http://creativecommons.org/licenses/by-nc-sa/3.0/ or send a letter to Creative Commons, 171 Second Street, Suite 300, San Francisco, California, 94105, USA.

Keywords: crochet patron gratuit, Anleitung, Häkeln, free crochet pattern, lapin, conejo, Kaninchen